Tuesday, October 30, 2007

cabinet hardware and electrical updates
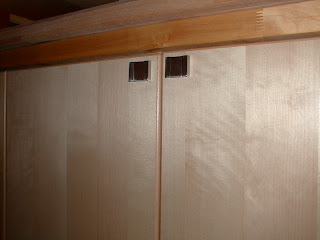

Here are the door pulls that we picked out for the back-side of the peninsula cabinets. They are flat against the face of the cabinet until you flip them up with the tip of your finger and then pull.


Here you can see why I've chosen this design. That lavender/turquoise door in the background is the (unpainted) bathroom door. Since the peninsula forms one "wall" of the corridor leading to the bathroom, and I know that I will bump into and bruise myself on anything in my path, I wanted as little sticking out as possible.


Here is the outlet that Richie moved up a few inches for us, and was kind enough to fill in the gap in the dry-wall with the piece he cut out. Now I just need to fill in with some joint compound before I replace the butcher block shelf.


Here is the latest challenge/debate. The original plan had the peninsula cabinets centered on the wall between the bathroom and kitchen sink area, however the choice was made to push the peninsula closer to the center of the room to widen the "hallway" to the bathroom by a mere inch or so, it now means that the cabinet to the left of this picture is only half an inch back from the corner of this wall. If the originally planned for drawer pulls are used here it will mean that the cabinet to the right, between the sink and the corner will have to be a hinged door that swings toward the sink which will be awkward. We could get a larger version of the flat hardware on the opposite side of the peninsula for the drawers on the left of the corner so that they lay flush to the drawer fronts and allow the drawers in the cabinet to the right to open fully. The downside to this is that I've already drilled holes and installed the original hardware on half of the other cabinets and we'll end up with mismatched hardware on this one cabinet. Paul is willing to accept this but I'm a little more hesitant to mess with the uniformity of my original design. I have a feeling he'll win out on this one.

Labels: , ,

Saturday, October 20, 2007


Here is the test fit for the butcher block shelf over the back splash behind the sink.


Here you can see that the shelf actually interfers with the placement of this outlet. The current plan is to have Richie move the outlet up an inch or 2. Don't worry, I've turned off the circuit, so there's no risk.


Here you can see the faucet handle in the hot position, showing why the bevel was necessary. I did the bevel by turning my hand plane on a 45 degree angle and shaving away layers to the depth I wanted, Then using the palm sander to smooth over the sharp edges, then Paul followed it up with a fine grade sanding.


Here you can see the bamboo flooring that I've cut to box in the platform for the dishwasher.

Labels: , , , ,

New Renovation To-Do list

Ok, first here's the old list, updated for clarification.

and here's the new list:

Kitchen:
- bevel the front edge of the window shelf above the sink to accommodate the faucet handle in the hot position
- install window-shelf behind sink
- caulk joints around sink area
- finish sand and oil sink area butcherblock
- box around cabinet legs with bamboo flooring (Richie says the inspector will want this)
- recut removable back panel for water-meter cabinet because I messed it up. This one is tricky.
- install final window trim piece above sink (need window-shelf done first)
- re-glaze, prime, and paint windows
- strip (partially done), prime, and paint doors
- install guide rails on window jambs and reinstall windows
- putty, sand, caulk, prime, and paint all trim molding
- touch up the wall paint here and there because of general carelessness.
- assemble cabinet drawers
- install cabinet shelves, and doors (only 1 cabinet left to go!)
- install drawer pulls on remaining cabinets
- caulk, and seal/waterproof thresholds

Dining room:
- re-glaze, prime, and paint windows
- install guide rails on window jambs
- putty, sand, prime and paint all trim moldings

Basically we haven't touched the diningroom because it has been used as storage/work space for the kitchen appliances and cabinets. Once the cabinets are completely out of the way I'm finished using it as my wood shop, we can really get down to business.

Bed room:
- re-glaze, prime, and repaint window sashes (partially done)

Labels: , , , , , ,

Wednesday, October 17, 2007

The Offset U

I've found that I much prefer nice deep drawers for most kitchen stuff because you can pull them all the way forward to access items at the back of the cabinet. So as soon as I realized that having drawers under a sink was possible, I knew I wanted them. Otherwise the space under the sink seems to end up such a Hodge Podge of cleaning items and things that get lost. I saw the idea in Fine Homebuilding magazine (Fall/Winter 2004) while I was brainstorming the kitchen design.

The key here is that instead of the trap coming down directly off of the sink drain, the sink drain is connected to a 90 degree elbow and then a pipe leading to the back of the cabinet with a rather shallow slope. At the back of my IKEA cabinet there is a small gap between the back of the drawer and the back of the cabinet. The U trap can be positioned here so that it is parallel to the back of the cabinet before the piping takes another 90 degree turn to head out the back of the cabinet. This method can also be used to make a wheel chair friendly sink space.

I further expanded this theory by converting the standard IKEA cabinets in the sink area to have removable back walls. This did several things including allowing all of the plumbing including the dishwasher hoses to be behind the cabinet, moving the sink worktop inward into the room closer to the stove and fridge, thus tightening the natural work triangle, as well as creating a small space behind the cabinets to hide the water meter and instant-on water heater.

Unfortunately I fell in love with a big, double bowl, apron sink. The sink itself is much deeper than a traditional drop-in sink which is why I had to modify the top drawer to accommodate the pipes leading from the drains to the back of the cabinet. A shallower, single bowl sink would have made the conversion much less painful. Another point to note is that while the plumber who did the rough-in thought I was brilliant in my use of space, the plumber who came back for the finish work(same company, just different guy) thought I was completely nuts and couldn't imagine why anyone would want to do such a thing. He went so far as to intimate that it wasn't possible, that I was going to have drain flow problems, and that there was no way the dishwasher was going to be able to be hooked up. He completely didn't get it and he politely fought me on it. I had to explain things to him very slowly and it made me wish I'd called Ask This Old House to get Rich Trethewey to come sort it out. Finally he got it and it was as if a light bulb went on. So this installation is probably not for the faint of heart. It makes me think that I should forget this math stuff and become a plumber.

Labels: , , ,

Monday, October 15, 2007

Progress Not Perfection

I just noticed that it's been a long time since I blogged. I've been pretty busy with school work. I have been plugging away at the kitchen though, small bits at a time. So here are some pictures:


Here is the finished end panel for the peninsula. I used a combination of drilling holes in the corners and threading the coping saw blade through the holes to cut the outlet. The far side is the cut side. I reclaimed the veneer off one of the cut pieces for that side by cutting as close as possible with the table saw and then sanding away the excess. I tried a couple other tactics for getting the veneer off, but they all damaged the veneer, so this is the one I went with. By far it was the easiest as well. I used titebond wood glue, a couple 1 inch wide scraps along the edges, and the band clamps that I bought for joining the counter tops. I glued it up, wiped off the excess with damp rag, and ended up letting it cure for a couple days because it took me that long to get back to it.


Here are the drawers installed under the sink. I think technically the larger drawer is supposed to be on the bottom, but to be honest I didn't notice that they were different sizes until I measured to center the handles. I think it works out better this way though because it means there is more room in the upper drawer. It does mean however that I'm going to have to make sure that the other drawers around the kitchen match so that there is uniformity. In this picture you can also see that the vertical part of the back splash has been installed.


Here's a picture of the inside of the top drawer under the sink. You can see that I cut out the back of the drawer in the middle to accommodate the plumbing under the sink. I ended up just using a hacksaw that I forgot I owned to cut down the sides from the top and then used a small drill bit to perforate the horizontal so that I could bend it with my bare hands. Then I used a metal file to smooth away the burr and some of the roughness. It's still not very smooth but it's not sharp enough to cut skin, and I plan to get some padded tape to fold over the cut edges. I also installed vertical dividers. I used a strip of the leftover end panel from the peninsula that still had the veneered edge attached. I drilled holes through the particle board bottom and used 2-1/2 inch cabinet screws from the bottom up and 1/2 inch cabinet screws through the metal drawer back. I wanted to make sure that the drawer could be opened and closed without the contents shifting and getting in the way of the plumbing.

Labels: , ,