Sunday, October 18, 2009

Helena Baby Cardigan

I finally got the chance to give the Helena Baby Cardi that I knit to my niece Phoebe. I got the yarn (Katia Alba) at a little yarn shop in Rochester NY while we were on vacation. The store happened to have just enough in the discount bin. The buttons were a serendipitous find at Joann's Fabric.


It's the middle of October and I'm watching out the window as snowflakes the size of my palm come down in front of the still mostly green trees and only a couple hours ago I was apple picking with Phoebe and her parents. It's a crazy year for weather!

Labels: , ,

Monday, February 25, 2008

Rev Lisa's art.


I bought these paintings from Rev. Lisa a long time ago before she left for warmer climes. Sorry about the terrible photograph...

Labels: ,

Monday, February 11, 2008

Oh my! It's almost Valentine's Day...

I'm somewhat shocked that it's been so long since I posted. This blog, though named for my love of programming and knitting morphed overtime into an almost full-time renovation blog. Since I haven't worked on the renovation in months, there hasn't been much to blog here. I have been blogging over here though. It seems that now that my kitchen is functional, I'd rather be cooking in it than painting the trim.

I have been knitting something, off and on, ...more off than on actually. I haven't posted pictures of it yet because it's a gift, and I have a long way to go on it.

On the programming front, I have been working on a little project in my free time that I hope will someday morph into something highly functional, at least for my own sake if no one else's, but I'm trying to limit working on it until I finish math stuff and raise my income level to something sustainable.

Labels: , , ,

Monday, December 31, 2007

End of year wrap-up

I've been reading a lot of blogs lately, but I haven't been blogging myself. Partly it's been the hectic end of semester/holiday crush, and partly it has been a terrible disappointment in the photos my camera is willing to produce. Without a flash things are a blurry mess, with a flash the photos are flat and washed out. Nevertheless, I will push on.

The kitchen has been in a state of mostly finished since Thanksgiving. It's quite functional, but the trim and some touchup paint need to be done in order for it to be truly presentable. I swear that I'm not going to leave it this way. I just wanted to get the semester out of the way and then I will start working on the finishing touches one section at a time.

In this photo you can see the base of the cabinets has been boxed in with flooring. I decided to use quarter round for the corners of the peninsula, but it still needs to be puttied, stained and sealed.


The side of the kitchen that you can't see has some temporary shelves, our old refrigerator and the blue tiled bar table that my sister designed and built for us. Eventually that side of the kitchen will be finished with upper and lower cabinets, built-in under cabinet fridge and freezer units, and an above-counter built in microwave. Hopefully all that will happen relatively soon, but it will have to wait until we have liquid assets to purchase it all with.

Since Thanksgiving, we've been doing a lot more cooking and I've become something of a bread baker. I searched for a good bread recipe and have settled on the NY Times no-knead-bread recipe, with a few modifications of course. Originally I used my Le Creuset dutch oven and the corn meal / oat bran that the recipe recommends. It was somewhat difficult to get the dough into the preheated pot because it is so sticky and fluid. I also wasn't crazy about the crust that it produced. Instead I have settled on a different tactic. I use either a glass loaf pan with its own lid that I grease with Earth Balance spread, or I use a metal loaf pan and form a tinfoil tent. I still cook covered for 30 minutes and then 20-30 minutes uncovered. It's about the best bread I've ever made and I've taken to making a double batch every few days. It's so easy, practically makes itself.

Using the same dough we made this pizza that passed muster with my omni DH. It's very simple, I pre-baked the crust, oiled on top with olive oil, on a silpat, then topped with Follow Your Heart Mozzarella, marinara (if you put the sauce over the cheese, it helps it stay moist and melt better) then red and green bell pepper slices, Trader Joe's Meatless balls. Put this in a 350 degree oven until the peppers are softened and then switch to broil until the cheese is nice and bubbly. While this was all baking I sauteed some onions until sweet and caramelized to top the pizza with when it came out. It was so worth the effort.


I'm finding that now that I have acres of countertop and new appliances cooking is a breeze. It's so much easier to make that slightly more complicated recipe and then have a dishwasher do the hard labor for me :)

Oh and there was knitting. I finished the candle-flame scarf that I started. It's so pretty to look at, but not quite what I was hoping for when I put it on. I think blocking might improve it, but I haven't gotten there yet. I also made a clapotis like every other knitter with internet access. I wasn't as pleased with it as I had thought I would be. I also started an afghan for my sister, and I think I will be knitting it for a very long time, despite the size 15 needles and double stranded worsted weight yarn.

Labels: , ,

Saturday, November 17, 2007

Renovation short list

I've updated the most recent to-do list with all the stuff I've accomplished and crossed off my list. I'm really on task when my classes aren't keeping me from it. I decided to make a short list for the timeline between now and when my family arrives for Thanksgiving.

Kitchen:
- recut removable back panel for water-meter cabinet
- sand, caulk, prime, and paint all trim molding
- prime and paint windows

Dining room:
- putty, sand, prime, caulk, and paint all trim moldings
- prime, and paint windows
- install guide rails on window jambs

Bed room:
- prime and repaint window sashes (partially done)

and if there's time:
- touch up the wall paint here and there because of general carelessness.
- prime and paint doors
- install guide rails on window jambs and reinstall windows

probably won't get to these:
- finish sand and oil sink area butcherblock
- caulk, and seal/waterproof thresholds

Labels: , , ,

Friday, November 02, 2007

We Have Heat!

The Osterman Propane guy came out today and the heat is now on and working. He was a colorful fellow with stories of how he spent his life thinking that he hated homemade mac & cheese until finally trying it as an older chap and finding out it was actually really good. He also gave me a little history lesson on Ireland and the origins of the term Black Irish. I don't know if it's true or not, but it made for some interesting conversation.

I've got the first coat of joint compound in the gaps around the outlets that needed it. Unfortunately I'm caught in a struggle between math homework and just wanting to finish this renovation once and for all.

Labels: , , ,

Tuesday, October 30, 2007

cabinet hardware and electrical updates


Here are the door pulls that we picked out for the back-side of the peninsula cabinets. They are flat against the face of the cabinet until you flip them up with the tip of your finger and then pull.


Here you can see why I've chosen this design. That lavender/turquoise door in the background is the (unpainted) bathroom door. Since the peninsula forms one "wall" of the corridor leading to the bathroom, and I know that I will bump into and bruise myself on anything in my path, I wanted as little sticking out as possible.


Here is the outlet that Richie moved up a few inches for us, and was kind enough to fill in the gap in the dry-wall with the piece he cut out. Now I just need to fill in with some joint compound before I replace the butcher block shelf.


Here is the latest challenge/debate. The original plan had the peninsula cabinets centered on the wall between the bathroom and kitchen sink area, however the choice was made to push the peninsula closer to the center of the room to widen the "hallway" to the bathroom by a mere inch or so, it now means that the cabinet to the left of this picture is only half an inch back from the corner of this wall. If the originally planned for drawer pulls are used here it will mean that the cabinet to the right, between the sink and the corner will have to be a hinged door that swings toward the sink which will be awkward. We could get a larger version of the flat hardware on the opposite side of the peninsula for the drawers on the left of the corner so that they lay flush to the drawer fronts and allow the drawers in the cabinet to the right to open fully. The downside to this is that I've already drilled holes and installed the original hardware on half of the other cabinets and we'll end up with mismatched hardware on this one cabinet. Paul is willing to accept this but I'm a little more hesitant to mess with the uniformity of my original design. I have a feeling he'll win out on this one.

Labels: , ,

Saturday, October 20, 2007


Here is the test fit for the butcher block shelf over the back splash behind the sink.


Here you can see that the shelf actually interfers with the placement of this outlet. The current plan is to have Richie move the outlet up an inch or 2. Don't worry, I've turned off the circuit, so there's no risk.


Here you can see the faucet handle in the hot position, showing why the bevel was necessary. I did the bevel by turning my hand plane on a 45 degree angle and shaving away layers to the depth I wanted, Then using the palm sander to smooth over the sharp edges, then Paul followed it up with a fine grade sanding.


Here you can see the bamboo flooring that I've cut to box in the platform for the dishwasher.

Labels: , , , ,

New Renovation To-Do list

Ok, first here's the old list, updated for clarification.

and here's the new list:

Kitchen:
- bevel the front edge of the window shelf above the sink to accommodate the faucet handle in the hot position
- install window-shelf behind sink
- caulk joints around sink area
- finish sand and oil sink area butcherblock
- box around cabinet legs with bamboo flooring (Richie says the inspector will want this)
- recut removable back panel for water-meter cabinet because I messed it up. This one is tricky.
- install final window trim piece above sink (need window-shelf done first)
- re-glaze, prime, and paint windows
- strip (partially done), prime, and paint doors
- install guide rails on window jambs and reinstall windows
- putty, sand, caulk, prime, and paint all trim molding
- touch up the wall paint here and there because of general carelessness.
- assemble cabinet drawers
- install cabinet shelves, and doors (only 1 cabinet left to go!)
- install drawer pulls on remaining cabinets
- caulk, and seal/waterproof thresholds

Dining room:
- re-glaze, prime, and paint windows
- install guide rails on window jambs
- putty, sand, prime and paint all trim moldings

Basically we haven't touched the diningroom because it has been used as storage/work space for the kitchen appliances and cabinets. Once the cabinets are completely out of the way I'm finished using it as my wood shop, we can really get down to business.

Bed room:
- re-glaze, prime, and repaint window sashes (partially done)

Labels: , , , , , ,

Wednesday, October 17, 2007

The Offset U

I've found that I much prefer nice deep drawers for most kitchen stuff because you can pull them all the way forward to access items at the back of the cabinet. So as soon as I realized that having drawers under a sink was possible, I knew I wanted them. Otherwise the space under the sink seems to end up such a Hodge Podge of cleaning items and things that get lost. I saw the idea in Fine Homebuilding magazine (Fall/Winter 2004) while I was brainstorming the kitchen design.

The key here is that instead of the trap coming down directly off of the sink drain, the sink drain is connected to a 90 degree elbow and then a pipe leading to the back of the cabinet with a rather shallow slope. At the back of my IKEA cabinet there is a small gap between the back of the drawer and the back of the cabinet. The U trap can be positioned here so that it is parallel to the back of the cabinet before the piping takes another 90 degree turn to head out the back of the cabinet. This method can also be used to make a wheel chair friendly sink space.

I further expanded this theory by converting the standard IKEA cabinets in the sink area to have removable back walls. This did several things including allowing all of the plumbing including the dishwasher hoses to be behind the cabinet, moving the sink worktop inward into the room closer to the stove and fridge, thus tightening the natural work triangle, as well as creating a small space behind the cabinets to hide the water meter and instant-on water heater.

Unfortunately I fell in love with a big, double bowl, apron sink. The sink itself is much deeper than a traditional drop-in sink which is why I had to modify the top drawer to accommodate the pipes leading from the drains to the back of the cabinet. A shallower, single bowl sink would have made the conversion much less painful. Another point to note is that while the plumber who did the rough-in thought I was brilliant in my use of space, the plumber who came back for the finish work(same company, just different guy) thought I was completely nuts and couldn't imagine why anyone would want to do such a thing. He went so far as to intimate that it wasn't possible, that I was going to have drain flow problems, and that there was no way the dishwasher was going to be able to be hooked up. He completely didn't get it and he politely fought me on it. I had to explain things to him very slowly and it made me wish I'd called Ask This Old House to get Rich Trethewey to come sort it out. Finally he got it and it was as if a light bulb went on. So this installation is probably not for the faint of heart. It makes me think that I should forget this math stuff and become a plumber.

Labels: , , ,

Monday, October 15, 2007

Progress Not Perfection

I just noticed that it's been a long time since I blogged. I've been pretty busy with school work. I have been plugging away at the kitchen though, small bits at a time. So here are some pictures:


Here is the finished end panel for the peninsula. I used a combination of drilling holes in the corners and threading the coping saw blade through the holes to cut the outlet. The far side is the cut side. I reclaimed the veneer off one of the cut pieces for that side by cutting as close as possible with the table saw and then sanding away the excess. I tried a couple other tactics for getting the veneer off, but they all damaged the veneer, so this is the one I went with. By far it was the easiest as well. I used titebond wood glue, a couple 1 inch wide scraps along the edges, and the band clamps that I bought for joining the counter tops. I glued it up, wiped off the excess with damp rag, and ended up letting it cure for a couple days because it took me that long to get back to it.


Here are the drawers installed under the sink. I think technically the larger drawer is supposed to be on the bottom, but to be honest I didn't notice that they were different sizes until I measured to center the handles. I think it works out better this way though because it means there is more room in the upper drawer. It does mean however that I'm going to have to make sure that the other drawers around the kitchen match so that there is uniformity. In this picture you can also see that the vertical part of the back splash has been installed.


Here's a picture of the inside of the top drawer under the sink. You can see that I cut out the back of the drawer in the middle to accommodate the plumbing under the sink. I ended up just using a hacksaw that I forgot I owned to cut down the sides from the top and then used a small drill bit to perforate the horizontal so that I could bend it with my bare hands. Then I used a metal file to smooth away the burr and some of the roughness. It's still not very smooth but it's not sharp enough to cut skin, and I plan to get some padded tape to fold over the cut edges. I also installed vertical dividers. I used a strip of the leftover end panel from the peninsula that still had the veneered edge attached. I drilled holes through the particle board bottom and used 2-1/2 inch cabinet screws from the bottom up and 1/2 inch cabinet screws through the metal drawer back. I wanted to make sure that the drawer could be opened and closed without the contents shifting and getting in the way of the plumbing.

Labels: , ,

Friday, September 14, 2007

Plumbing Complete!

Labels: , ,

Tuesday, September 04, 2007

One room down...


...two to go.

Labels: ,

Friday, August 31, 2007

Some accomplishments

Yesterday Richie installed our new fan:


And our new stove:


The bedroom is *so* close to being finished, but I am waiting until it's completely finished to post a pic. Up on the agenda today will probably be the sink area countertops and more work in the bedroom.

Labels: , ,

Thursday, August 09, 2007

Renovation To-Do list

Kitchen:
- adjust cabinet openings for appliances
- install appliance platforms
- install counter-tops
- route out bottom of water-meter cabinet
- install bolts for removable-backed cabinets
- install remaining baseboard and quarter round
- buy and install foundation wall cap
- install thresholds for front door, bath room door, and living room door
- stain, caulk, and seal/waterproof thresholds
- install end panel on penninsula
- have plumber in to install sink and dishwasher
- finish backsplash/window-shelf framing behind sink (need sink installed first) (the framing is done, just need butcherblock shelf installed)
- install trim pieces above sink (need window-shelf done first)
- remove doors from hinges (The hinge pins are stubbornly fused in place. I'm not sure how it's possible considering that the doors still swing, but apparently it is. Also, the screws that hold the hinges to the door and doorjamb are also impossible to extricate)
- strip, prime, and paint windows
- strip (partially done), prime, and paint doors
- rehang doors (see above)
- install guide rails on window jambs and reinstall windows
- putty, sand, caulk, prime, and paint all trim molding
- assemble cabinet drawers (mostly done)
- install cabinet shelves, doors, drawers (partially done)
- have electrician come and finish electrical work

Dining room:
- buy and install trim pieces for window aprons
- strip, prime, and paint windows
- install guide rails on window jambs
- putty, sand, prime and paint all trim moldings
- buy and install smoke detector

Bed room:
- cut and reinstall doorjamb
- buy and install trim moldings for support beam
- install healing duct and vent cover
- strip paint on window muttons, prime, and repaint
- remove closet door, prime, paint and rehang
- putty, sand, caulk, prime, and paint all remaining trim
- install door threshold
- buy and install smoke/CO detector
- install puck lights in closets

Labels: , , , , , , ,

Thursday, August 02, 2007

Sink cabinet framing

I fully intended to blog more about DexCon, but since Paul and I were sharing my laptop, there wasn't any wifi in the hotel room (even though there was in the Con area), and Paul was hogging using it to track his character sheets in all his rpga games.... I never actually got the chance and I forgot to continue taking pictures.

So here's a renovation photo....


The area behind the future home of the sink is all framed up (except for the backsplash which I'm keeping relatively open for the plumbers), everything is level, square and ready to go. I think I'm going to let the plumbers do their thing and then create the removable back panels for the cabinets after. Or at least the sink cabinet.... I might do the one next to it first so that they can see what I'm trying for. It's all a tight squeeze, so I'm hoping that the dishwasher fits without a huge problem. The plumber might need to reroute the pex piping for the outdoor spiggot though... Not sure what he was thinking when he made that stick so far out from the wall....

Labels: , , ,

Sunday, July 01, 2007

cabinets!


Here are the cabinet carcasses for the kitchen peninsula. The gap is for the drop-in stove.

Labels: , ,

A Door!


Paul and I installed the door on Thursday and then we shaved off a bit at the bottom, re-hung it on its hinges and I installed the knob this morning. It's so nice to have a door on that closet now :) Of course we still need to wrap it with moldings, but you get the idea.

Labels: , ,

Sunday, January 07, 2007

Primed and ready to paint

This is the dining room with the tinted primer on the walls and the ceiling already painted.

I think my camera hates blue. This picture doesn't really do it justice. It's sort of a zen periwinkle. Very calming. I can't wait to see the actual paint.

Here is the kitchen with the tinted primer up on the wall.

This is the second coat of primer since it goes up a little splotchy. I think I'll do one more coat of primer and then paint the real color.

Labels: , , ,

Wednesday, November 29, 2006

Plight of the Fremen

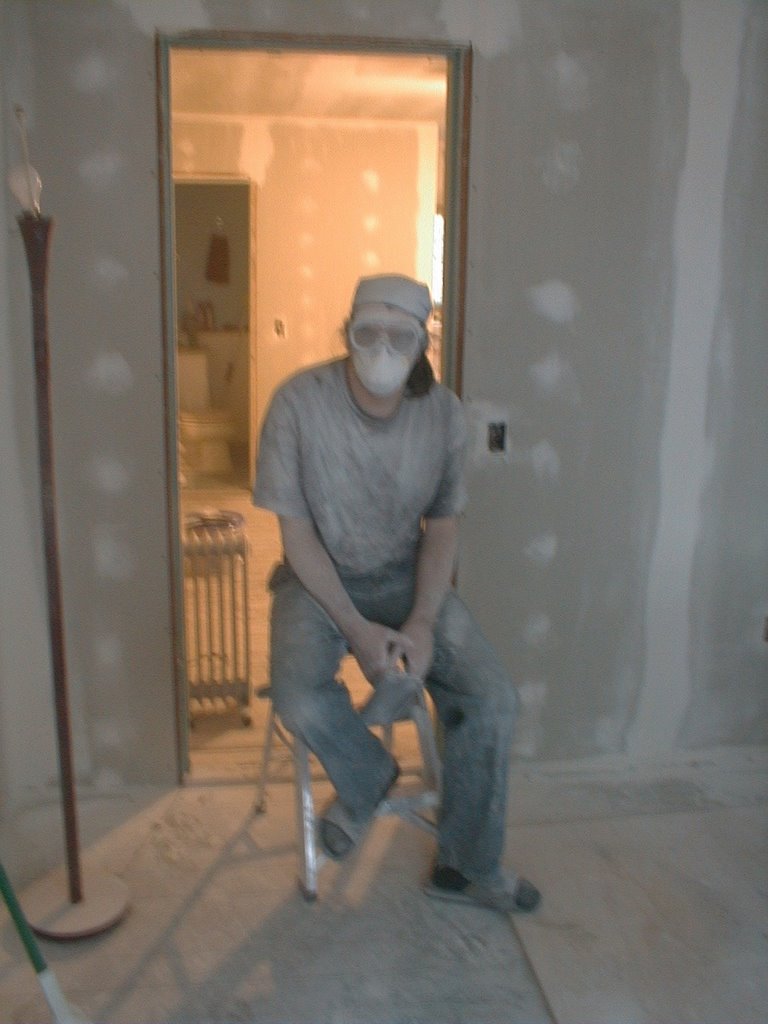
This is what drywall sanding makes Paul look like:

I know it seems like it's taking us forever, because it is. Painting the bedroom made me realize just how noticeable all those little imperfections are once it's all a field of solid color. So we're going back over every inch of wall and smoothing everything out as much as possible. It is by far the suckiest part of the job. By Far. I can't wait to be done with the dust and on to the paint. Really.

Labels: , , ,